Thursday, January 31, 2013

Birch Tree Landscape

Fourth Grade Art Lesson
2 Class Periods
Birch Tree Landscape, Fourth Grade Art Lesson
 
Day 1:
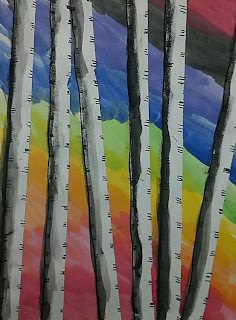
  • As a class we reviewed the four parts of a landscape:  foreground, middle ground, background, and horizon line.
  • We discussed how our paintings were going to concentrate on the middle ground aspect of a landscape.  Our trees would have no tops or bottoms (zoomed in view).
  • Using watercolor paper we placed painters tape on the paper to create the trees for the composition.  Students were asked to have at least 5 trees in their composition.  The trees could overlap, but they had to go off the page from top to bottom.
Student taping trees in place.

  • As a class we discussed analogous color schemes (colors next to each other on the color wheel). Students were reminded that colors had better blending transitions if they were closer together on the wheel versus further apart.
  • A wet-in-wet technique was demonstrated to the class.
  • After painting, students slowly removed the tape revealing the resist which created the Birch tree.
Day 2:
  • On the second day we discussed the concept of light and shadow.  Students were asked to pick a light source and decide where it would be coming from within the composition.
  • A demonstration was given on how to shade the side furthest from the light source with black tempera paint.  Students used a wet brush to soften the edge of the black paint to create a gray tone. The value scale (light to dark) that was created gives the illusion of a three-dimensional tree within the composition.
  • Students completed the project by adding the short horizontal lines within each tree to define it as a Birch tree.
Student painting shadows on trees.

Student Examples:


Friday, January 25, 2013

Fat Cat on a Mat

Kindergarten Art Lesson
2 Class Periods
Fat Cat on a Mat, Kindergarten Art Lesson
 
Day 1
  • Students listened to the story Fat Cat On a Mat by Nurit Karlin.  Students were asked to listen for the rhyming words within the story.
  • Using follow along demonstration, students create their own fat cat.  Shapes were reviewed as we drew the parts of the cat.
  • Once cats were drawn, students sponge painted the cats using liquid tempera paint.
Day 2
  • Together as a class we discussed the term pattern (a repeating design).  Several examples were given in class.
  • Students were then instructed to cut an oval out of a 12 x 18 inch piece of construction paper and were asked to place their own pattern around the border.
  • Finally, students cut out their fat cat from the day before and glued it to their completed mat.
Student Examples:


Wayne Thiebaud Cupcakes

Sixth Grade Art Lesson
5 Class Periods

Wayne Thiebaud Cupcakes, Sixth Grade Art Lesson
About the Artist

Wayne Thiebaud was born in 1920, in Mesa Arizona.  He began his art career as a cartoonist.  He later, became an art teacher and taught students for nearly 20 years.

Artist Wayne Thiebaud


Thiebaud is a POP ARTIST.  He is best known for his delicious pastry paintings of cakes and pies. 

Cupcakes by Wayne Thiebaud


His paintings are often described as being "frosted" due to his use of thick paint.  His paintings also tend to use exaggerated colors and well defined shadows that use complementary color schemes to make them vibrate within the composition.

Thiebaud is still alive today and is lives in Sacramento, CA.


YouTube video shared in class on Wayne Thiebaud.

Day 1
  • Students watched YouTube video clip on the life and artwork of Wayne Thiebaud. 
  • Using a real cupcake, students created a drawing from observation on a small piece of paper.
Student drawing cupcake from observation.
Day 2
  • Using carbon paper, students traced their cupcake drawing from the class before on 12 x 18 inch paper. 
  • Students were asked to think about the use of space within their composition.
  • Cupcakes were outlined with sharpie marker.
Day 3 
  • A horizon line was incorporated into the composition to represent the table for the cupcakes to rest on.  Students were asked to watch for "floating" cupcakes.
  • A shadow was added to each cupcake.
  • Students were reminding of painting tips and strategies.  Students were allowed to paint compositions in any color of their choice. 
Let the painting process begin!
Day 4 
  • A discussion took place on how Wayne Thiebaud used complementary color schemes in his artwork to provide more dimension.  Students were asked to incorporate a complementary scheme within the shadows of each cupcake.
  • Students continued to work on painting.
Student working on complementary shadows.

Day 5
  • Last day to complete paintings.
  • Compositions were re-outlined if needed.

Student Examples


Wednesday, January 2, 2013

Fifteen Minutes of Warhol Fame

Fourth Grade Art Lesson
3 Class Periods

Fifteen Minutes of Warhol Fame, Fourth Grade Art Lesson
"In the future everybody will be world famous
for fifteen minutes."  -Andy Warhol

About the Artist:
Andy Warhol was born August 6, 1928 in Pittsburg Pennsylvania.  He is famous for his "pop art" paintings of everyday items such as soup cans, coca-cola bottles, dollar bills and his screen-printed portraits of famous celebrities.  Many believe he is the leader of the POP ART movement.
Andy Warhol
He spent most of his life trying to prove himself as an artist.  Many viewers and fellow artists struggled accepting his art as a true art form.  The question, "What makes art, Art?" became a debate that many artists, students, and teachers still discuss today.

Lemon Marilyn, 1962 by Andy Warhol.

Warhol died February 22, 1987.  He was 58 years old.  Today his paintings are worth millions of dollars.

Day 1:
  • Students viewed YouTube video clip on the life and artwork of Andy Warhol.
  • A discussion was held on what they thought of Warhol's work and if they considered the paintings he made as art.
YouTube video shared in class on life and artwork of Andy Warhol.
  • Students were given photocopied pictures of themselves. 
  • Students were instructed to color one of the photocopies as true to life as possible using colored pencils.
 Day 2:
  • Students were asked to color two more self-portraits.  Students were asked to use a monochromatic (one color) color scheme and a black and white scheme.
Day 3:
  • Students were asked to color the last portrait using a complementary color scheme (color's opposite on color wheel).
  • All portraits were cut out and mounted to a white piece of paper.
  • Final compositions were mounted to black construction paper to create a mat around the image.
Student Examples: