
Third Grade Art
2 Class Periods
50 minutes per class

Clay Chicken Bell, Third Grade Art Lesson
Day 1: We use every precious minute to create this sculpture in one class period, so while we work we discuss different topics ranging from the history behind the pinch pot to how art can be decorative or functional. I have colleagues who have suggested that this would also be a great Mexican Folk Art lesson.
Step 1: Gather all supplies needed to get started. Student have a clay mat to work on, a clay needle tool, a stick, a water bucket with a small amount of water in it and a ball of clay, roughly the size of a tennis ball.

Gathering supplies.


Step 2: Divide the clay ball in half. Set one half in the corner of the mat for later and roll the other half into a smooth ball.

Step 3: Insert thumb into clay ball to begin pinch pot.

Step 4: Create pinch pot.


Step 5: Set pinch pot off to the side. Take the second ball of clay and divide it in half. Put half in the corner of the mat and roll the other half into a smooth ball.

Step 6: Insert thumb into the clay ball.


Step 7: Create a thumb "cast" with the clay. Set off to the side.

Step 8: Slip and score the thumb cast to the pinch pot. Students may need a demonstration and explanation of the slip and score process if you have not done this with your students before.

Step 9: Pinch out a beak and comb for your chicken.

Step 10: From the clay ball take a small piece to roll a ball the size of a marble.


Step 11: Divide the marble size ball of clay in half. Slip and score each half to each side of the chicken's head for eyes.

Step 12: Taking a clay stick, use the flat end to poke a hole to form the pupil for the eye.


Step 13: Take the remaining clay you have left. Divide it in half. Put one part in the corner of your mat and take the second part and flatten with the palm of your hand to thickness of a pancake.


Step 14: Using your needle tool, draw a crown shape on the flatten piece of clay. Cut out and slip and score to the back of the pinch pot to create the tail.


Step 15: Flatten the remaining clay with the palm of your hand (pancake thick). Using a needle tool, have students draw 2 capital letter "D's" into the clay.


Step 16: Attach the wings to each side of the pinch pot using slip and score technique.

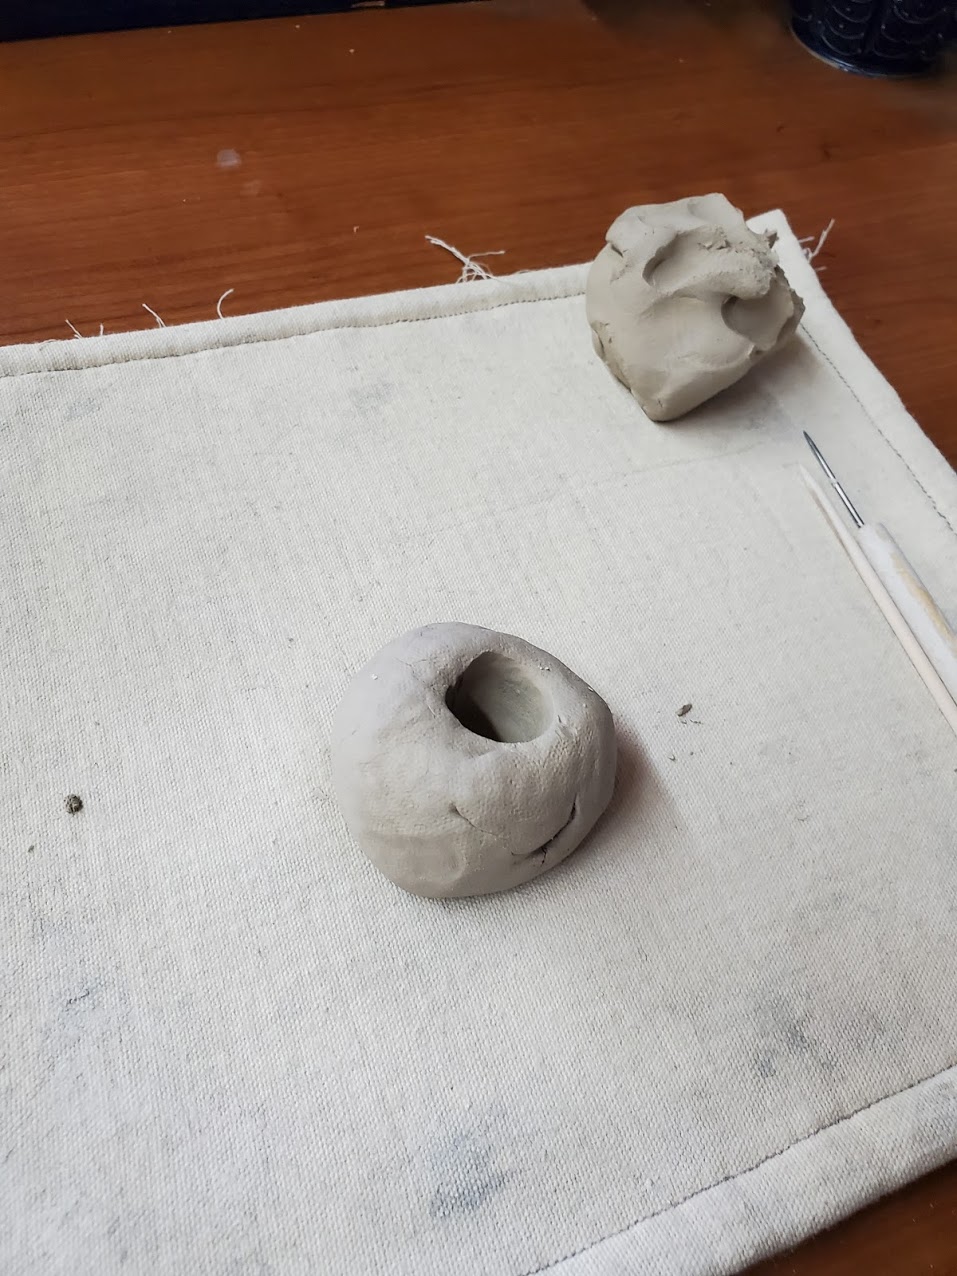
Step 17: Any remaining clay will be rolled into marble size ball shapes to create the clackers for the inside of the bell. Trust me, it is ok to have extra.

Step 18: Demonstrate to students who to poke a hole through the clay ball. Make sure you can see all the way through the hole. Give it a wiggle so you can be sure it is wide enough to put string through for later. This is a great reason for students to make extra if they have the extra clay. Lots of them don't poke the hole through completely.

Step 19: Poke a hole in the center of your clay chicken. This is where we will attach the clay clacker later. I have students use a needle tool to scratch their name inside the bell.
Day 2: Have student glaze their rooster. I set out specific color choices for the body, wings, tail, beak and comb. Students take turns using the glaze they need. I demonstrate/review with students how to use the glaze correctly, remind them to use three coats and check for proper coverage. Fire pieces for a second time when glazing process is complete.
* After the pieces come out of the kiln, I take string and attach the clapper to the inside of each bell. You absolutely could have students do this step themselves if you wish.

Take clappers and pre-cut string. I use a needle with a fairly large eye to help thread the clapper.

Threading the clapper.

Tie knot on one end to secure.

Push string (using the needle) through the hole created in the bell.

Pull off needle.

Tie knot and secure with a bit of hot glue.
Student Examples:


