Showing posts with label Second Grade Art. Show all posts

Wednesday, October 14, 2020

Screaming with Munch

 Second Grade Art Lesson

3 Class Periods (50 minutes per class)

Screaming with Munch, Second Grade Art Lesson

"I was walking down the road with two friends when the sun set, suddenly the sky turned red as blood.  My friends went on walking, as I shivered in fear...then I heard this enormous scream."
                                                                                                               -Edvard Munch
Artist Edvard Munch.  1863-1944.

About the Artist Studied


Edvard Munch (1863-1944) is an expressionist/symbolist painter from Norway.  His paintings are very dark and dreary.  They reflect the emotions he had dealing with multiple deaths within his family. His most famous painting is entitled The Scream or The Cry.  It is painted on a piece of cardboard with oil pastels and tempera paints.  The artist made four versions of this painting during his lifetime.  Each is worth an estimated $80 million dollars.  In the spring of 2012, one of the versions sold at a New York action for $120 million dollars.

The Scream by Edvard Munch.
Day 1

Students will examine and discuss the famous painting The Scream and the artist who created the piece:  Edvard Munch.  As a class we also examined and discussed several parodies of The Scream. Students highly enjoyed these and much laughter filled the classroom.
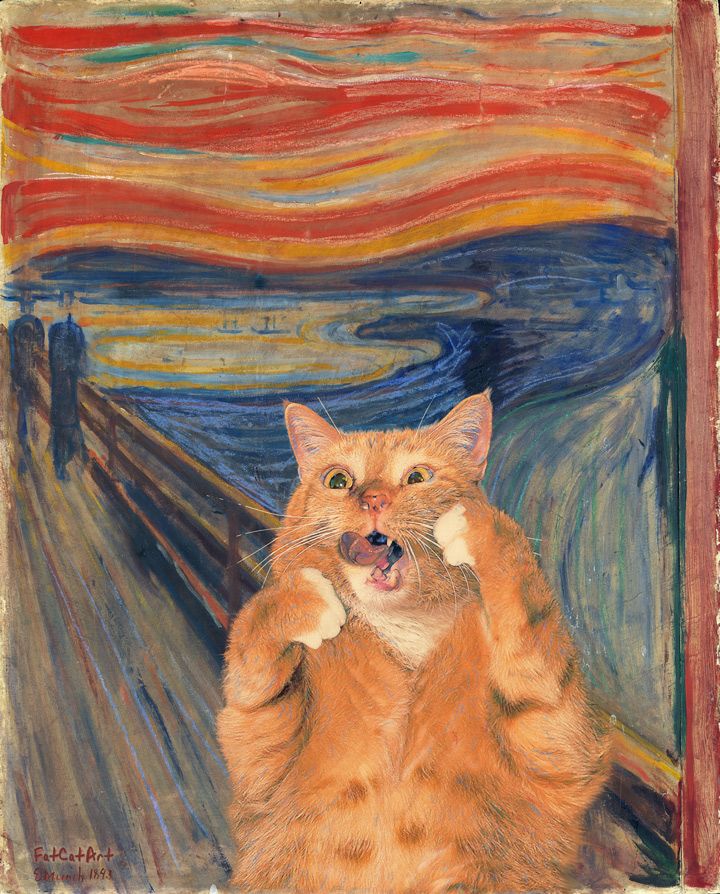
Parodies of The Scream.


Students created a background similar to theThe Scream through follow along demonstration.  Instructions were given on how to color the background to make it appear similar to the original painting. We used oil pastel to color our composition.

While students are coloring their compositions, pull them aside one at a time to photograph them "acting out" a scream.  Print the photos for next class session.

Day 2

Have students finish coloring their compositions on this day.

Day 3

Pass back to student their photograph taken on day 1.  Demonstrate to the class how to carefully cut around their photograph and how to place it parallel to the bottom of their paper.  We use bottle glue to glue our photograph on versus a glue stick.  I don't feel that the adhesive from the glue stick bonds that well to oil pastels.


Students are then given a small container of baby oil and a paint brush.  I demonstrate to the students how to paint over the oil pastel with the baby oil.  Students "Oooh and Aaah" over this part.  Added bonus, the room smells nice, too.  

A couple of tips:

Be careful not to put baby oil over the photograph, it will stain the photo with a grease spot.

Have students paint one color at a time with the baby oil or the colors can get a bit murky.

Student Examples:


Wednesday, December 18, 2019

Britto Monochromatic Pumpkins

2nd Grade
2 Class Periods

Britto Monochromatic Pumpkins, 2nd Grade Art Lesson
*This lesson idea was discovered on Deep Space Sparkle.  I thought I would give it a try this year.  I do love the results, but maybe next year instead of doing a monochromatic theme I may have students paint with the bright colors that he uses throughout his artwork to make it relate more to the artist being studied.

Romero Britto was born in Brazil on October 6, 1963.  He is considered a Pop Artist.  His artwork is well known for their bold outlines, bright colors and whimsical patterns.

Romero Britto
Heart Kids by Romero Britto.
Day 1:
Students began day one of this lesson by drawing a pumpkin together as a class on a piece of 9 x 12 inch orange paper.  (I had various tints and shades of orange paper cut for students to choose from).  After the pumpkin was in place, we divided up the background of the composition using a ruler.  In one of the spaces I instructed the students to place diagonal lines, in another space vertical or horizontal lines and in a third space a zig zag line.

Breaking up background space with a ruler.
Compositions were then outlined with a sharpie marker.

As students were outlining their compositions, I set up palettes of liquid tempera paint that contained orange, yellow, red, brown and white paint.

Students were shown how to create tints and shade of orange with the paint on their palette to create a monochromatic color scheme. Students used the remaining minutes of class to start painting the tints and shades in their composition.  I encouraged students to leave some of the paper showing since it was also orange.

Painting monochromatic scheme.
Day 2:

On the second day of class I had several painting stations set up in the class room.  

The first station contained the same colors of paint that we used on the first day for students to continue painting in areas to create that monochromatic scheme.  (Some of my students needed more time to complete this from the previous class period).

The second station had a palette that contained orange, yellow, white, brown and red.  Students were instructed NOT to mix these colors.  They used these colors to paint in patterns and designs inspired by Romero Britto.  I allowed them to paint in areas with white as well.


Adding patterns with paint.
The third station was set up with black paint.  Students used the black paint and a very tiny brush to outline all the areas where they originally placed sharpie marker.  Students were given tips on how to hold their brush and how now to smudge their lines.  I also, allowed students to paint in areas with black or create patterns with the black paint as well.

Examples of Student Work:


Monday, April 8, 2019

If the Dinosaurs Came Back Magnets

Second Grade Art
1 class period
If the Dinosaurs Came Back Magnets, Second Grade Art Lesson

As you all know, sometimes you get a donation for the art room that is too good to turn away, but at the same time leaves you wondering how on earth are you going to use this in your art room or try to incorporate it into your curriculum. 

I was given a generous donation of a large roll of magnetic sheet.  I decided to unroll the sheet and cut it into 5 x 5 inch squares.  The magnet sheet is very thin, so I was able to do this very easily on the paper cutter.

Day 1

To begin this lesson I read the story, If the Dinosaurs Came Back by Bernard Most.  We discussed the dinosaurs we saw in the book and the contrast of the pictures.  To pump up this lesson and fit it better into my curriculum we also discussed the concept of cityscapes.  Vocabulary Discussed: cityscape, horizon line, foreground, background, middle ground, overlapping.

Students were given some ideas and tips on how to create dinosaurs and how to place them in a modern day environment.

These projects turned out wonderful!  Students were also super excited that it could be taken home and put on the fridge right away.

Examples of Student Work:


Friday, May 18, 2018

Word Ladders Inspired by Jasper Johns

Second Grade Art
3 Class Periods
Word Ladders Inspired by Jasper Johns, Second Grade Art Lesson
About the Artist:
Jasper Johns
American painter Jasper Johns is best known for his paintings of numbers, letters, targets, maps and flags.  He was born on May 15, 1930 and currently still alive today.  For this project we were inspired by his piece entitled Colored Alphabet.
Colored Alphabet by Jasper Johns.
The following is also a YouTube clip that I shared with students about the artist.  I did not show the very last part since it related to a different project inspired by the artist.
               Brief Biography of Jasper Johns

Day 1:  


To begin this lesson students learned about artist Jasper Johns.  We discussed details about his life as well as examined several pieces of his artwork.

I had done some prior investigating with the second grade teachers to see if students were familiar with word ladders. I was excited to hear that students at my school did have a basic knowledge of this topic.  Thanks to this, I was able to begin the lesson with more of a review approach.  We reviewed the concept of word ladders (taking a word, changing one letter to make a new word, and then continuing the process to form new words).  As a class we created a word ladder together.  I then gave students a handout for them to create their own word ladders.  Each word had to be 4 letters long.  I had numerous examples on display and informed students that they could also copy one of the many examples I had on another handout that I had provided to the students.

I had  students glue various size pieces of newspaper to their 12 x 18 inch paper before they traced their letters. I recommended gluing five pieces down.  Piece could overlap.  I informed students we were more interested in the text then photographs.

Students used stencils (3 inch wide) to trace the letters of their words on a 12 x 18 inch piece of paper.

Oil pastels were used to color in the letters.

Coloring in letters with oil pastels.


Day 2:

Students that needed to finish coloring in their letters with the oil pastels continued to do so.

After letters were colored in, student painted the background of the composition using liquid tempera paint.  Students were encourage to explore the many possibilities paint offered by mixing colors and experimenting with brush strokes and brush size.
Painting compositions.

Day 3:

On this day I shared this YouTube clip on the artwork of Jasper Johns.  It is a song that I found quite catchy and the students enjoyed it, too! Jasper Johns Song

Students were allowed to finish painting today.


If paintings were complete, students were asked to go back into their composition with the oil pastels and touch up any letters that were hard to see.

Student Examples: