Thursday, May 2, 2013

Starry Night

First Grade Art Lesson
3 Class Periods
Starry Night, First Grade Art Lesson
About the Artist:

Vincent van Gogh was born in The Netherlands on March 30, 1853.  He is known as a Post-Impressionist painter.  His painting style is very recognizable due to his use of heavy pigment and expressive brush strokes that give his artwork a sense of movement.

He created over 2,000 sketches, drawings and paintings during his life time, however, Vincent never knew fame or fortune.  He sold only 1 painting during his whole career! 

Starry Night is his most well known piece.  Vincent painted the piece in 1889. Today it is considered priceless.  It can be viewed at the Museum of Modern Art in New York City, which acquired the piece in 1941.

Vincent van Gogh died July 29, 1890 from a self-inflicted gun shot wound.  He was only 37 years old when he died.

Artist Vincent van Gogh.  Self-portrait.

Starry Night by Vincent van Gogh. 
Day 1:
  • Student's viewed a power point about the life and work of Vincent van Gogh.  His painting of Starry Night was discussed and examined in great detail.
This video clip allows students to understand the movement Van Gogh created within his piece.

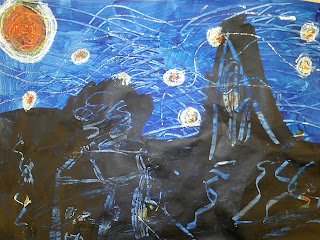
  • Students used oil pastels in orange, yellow and white to create glowing stars on 12 x 18 inch heavy white paper.  Students were instructed to place stars from the top to the bottom of the paper.
Student creating stars.
Day 2:
  • The classroom is set up in numerous stations for this day. 
Station One:
  • Finish stars that were not completed the class before.
Station Two (Create Wind):
  • Students paint the entire paper as quickly as they can with blue paint.
  • After the paper is covered texturing tools are used to scrap into the paint, which creates the wind.
Student creating wind within the painting.

Station Three (Create Horizon Line):
  • Using black paint, students create a horizon line upon the composition.  Everything beneath the horizon line is painted black.
Station Four (Details):
  • Rubber tipped drawing tools are used to draw into the black paint.  Students can create buildings, rocks, roads, trees and shrubs.
  • Pieces are placed on drying rack when completed.
Day 3:
  • Students viewed YouTube clip on work created by Vincent van Gogh.
This is one of my favorite videos I share with my students all year long!
  • Students used oil pastels to re-draw stars they felt needed to be brightened within the composition.
Student brightening up stars with oil pastels.

  • Glitter glue was added to the sky to add just the right amount of twinkle to each star and show emphasis for the wind.
Examples of Student Work:


Making the Small Monumental

Fifth Grade Art Lesson
3 Class Periods
Making the Small Monumental, Fifth Grade Art Lesson
Day 1:
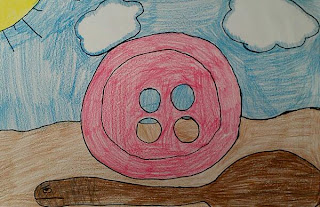
  • As a class we discussed several artists (Georgia O'Keeffe, Jim Dine, Claes Oldenburg) that took their subject matter and made it larger than life to show the importance of it.   Students were instructed that they would be creating a drawing that showed this "monumental" feeling for an object within their composition.
Apple Core by Claes Oldenburg, 1992.

Seashell by Georgia O'Keeffe, 1938.


1.  Students picked an object to draw from observation.  I had various items for them to choose from:  various tools, nails, buttons, shells, glasses, markers, brushes, various art supplies, tooth brushes, combs, etc.  They were also allowed to bring in their own objects.
2. Student drew the object as large as they could on their paper.  Students were reminded to look at the object for reference and not rely on what they knew the object to look like.  Attention was paid to details within the object.
Student working on details to object.

3.  Next, students were asked to create a background for their object.  The object could be anywhere as long as it made the object appear larger than life.

Day 2 and 3:

1.  The compositions were outlined with black sharpie marker.
2.  Students colored their compositions using markers, crayons or colored pencils. Craftsmanship was stressed.

Student Examples:


1-Point Perspective Drawings

Third Grade Art Lesson
4 Class Periods
1-Point Perspective Drawing, Third Grade Art Lesson
"There are three aspects to perspective. The first has to do with how the size of objects seems to diminish according to distance: the second, the manner in which colors change the farther away they are from the eye; the third defines how objects ought to be finished less carefully the farther away they are."
 -Leonardo da Vinci

Day 1:
  • As a class we discussed the idea of perspective.  We discussed bird's eye view, worm's eye view and the perspective of person looking straight on at an object.
  • Students learned that drawing objects in the correct perspective would enable them to create drawings that appeared more realistic.  Their drawings could become more 3-D with this skill.
  • We discussed that there are many different types of perspective drawings (1-point, 2-point and 3-point).  Students were informed that they would be using 1-point perspective.
1.  Using a ruler students drew a large "X" on their paper. 
2.  Where the "X" intersected students placed a small dot.  This is known as the vanishing point. Students learned very quickly the importance of this small dot in their composition.
3. A road was created first, then the sidewalks.  Students were shown how to use their ruler correctly to create a straight line. Horizontal lines were created on the sidewalk.
4.  Students were shown how to draw trees on one side of their composition.  We discussed how the largest trees needed to be in the foreground.  As they drew more trees along the sidewalk, the trees needed to get smaller and disappear by the vanishing point.
5.  Students used the vanishing point to create a horizon line behind the trees showing where the sky and ground met.

Day 2:

1.  Students were shown how to draw buildings within the composition.  Vertical and horizontal lines were discussed.  Students were shown how use the vanishing point on certain sides of the buildings to create doors, windows and signs in the correct perspective.
2.  Using the rest of class time, students continued to add details to the drawing.
3.  A black sharpie marker was used to outline the entire composition.

Day 3  and 4:

1.  Details were continued.
2.  Projects were colored with colored pencils.

Examples of Student Work: