Monday, December 11, 2017

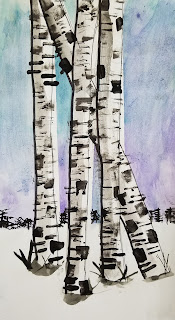
Winter Birch Trees

Fourth Grade
2 Class Periods

Winter Birch Trees, Fourth Grade Art Lesson

This year I put a new spin on my Birch Tree lesson.  To view the original lesson click here: Birch Tree Landscape.  I feel that my students did fairly well with the changes I made for this lesson, although it was bit more challenging for some of my students then the previous Birch Tree Landscape lesson I did the year before.

Day 1:
Students used painters tape to create the trees which then set the paper up for a resist.   In addition to the tape, students also blocked the bottom part of their paper with heavy tagboard to keep the area white for the snow on the ground.
Adding tape to create tree resist.

Adding tagboard to create the snow on the ground resist.

Students next painted the sky.  Once the sky was painted, the tagboard was removed.  Students used watered down black tempera to create shadows on the bottom of the tape (this is where the tree will be growing from the ground).
Adding the shadows near the bottom of the tree after the tagboard is removed.  Notice tape for the trees is still in place.

Removing the tape that represents the tree after the shadows on the snow have been added.

Next, students carefully removed the painter's tape and set pieces on drying rack to dry.
What project looks like after day 1.

Day 2:
Student began day 2 by taking a ruler and a pencil and outlining the outside of their trees.  Students that chose to have trees cross in their compositions had to think about which tree was in front.  To help them I had them look at the bottom of their paper to see which trees were longer, those would be the ones closest to them.

After the trees were outlined with a pencil, I had students outline one side of the tree with a thick black sharpie marker.  We had a discussion about shadows and highlight.  After they picked the side of the tree that would be outline with the thick black sharpie, students used a light black tempera paint wash to paint a shadow on that side of the tree.

I next demonstrated to students how to add some details to their background such as trees and to their foreground like blades of grass popping out by the trunk of the tree.

Using liquid black tempera paint and little scraps of tagboard I demonstrated to students how they could scrape and add lines into their trees to create the Birch tree look.

Other things that could be added might be a fence in the background or snow falling down.  Maybe, next year I will expand once again on this lesson. 

Examples of Student Work:


Monday, November 13, 2017

Leaf Dot Painting

Leaf Dot Painting
3 Class Periods

Leaf Dot Painting, Fourth Grade Art Lesson

Day 1: 

Have students choose an 8 x 10 piece of construction paper in a warm hue.  Students then select a leaf pattern.  The leaf pattern is cut and traced upon the construction paper.  Students are instructed to outline the leaf with a bold black line using a sharpie marker.

Day 2: 
Students viewed a YouTube clip on the culture and art style of Aborigine artists.  Students learned that Aboriginal art relates to nature, is painted in earth tones and is shown usually from a bird's eye view.

Students used paint in warm hues and white to paint dots within their leaf on the construction paper.  We used a Q-tip to create the dots.  Students were reminded to keep the dots in a line and to make sure there is a bit of space between each dot.
Dotting leaf with warm colors.


Day 3:
On the third day students cut their leaf out from the warm colored construction paper and glued it onto a cool hue construction paper (8 x 10 inches).  I next demonstrated to students how to begin with black paint and divide up the space around the leaf.  I told students to use the veins of the leaf as their guide and if large areas of negative space still existed, divide those in half.

Dividing up the negative space with black paint.
Students then used paint in cool hues to continue dotting the background of the composition.  We reviewed Aborigine art style characteristics.
Dotting the background.

Day 4:
You do not need a whole class period for this last step, but it can't be done till the paint dries from the previous step.  As a finishing touch have students mount their final piece of work onto a warm colored piece of construction paper (9 x 12 inches). 

Student Examples:


Thursday, November 2, 2017

Prehistoric Art in the Making

My first grade students today tackled some prehistoric art.  We discussed and examined images from the Lascaux caves located in southwestern France.  There are over 600 wall paintings decorated on the walls and ceiling of the cave that date back to 17,000 BP.


Wednesday, October 25, 2017

Picasso Frankensteins

First Grade Art Lesson
2 Class Periods
Picasso Frankensteins, First Grade Art Lesson
Day 1:
Students viewed the following YouTube clip on Pablo Picasso A Lesson on Pablo Picasso.  We only viewed the first part of the clip and I turned it off when it went over the self-portrait lesson, since we were going to be making a different project.  I found this YouTube clip to be very informative and grade level appropriate.

After viewing the clip and discussing The Three Musician composition by Pablo Picasso in some detail, students were given the details about the monster, Frankenstein.  Many students had heard of Frankenstein, but lots of them did not know the details of the actual story.  We had a great discussion on how important  it is to treat others with kindness and compassion even though their outer appearance may be different than ours.

To begin students were given a 12 x 18 inch piece of white construction paper.  Students were instructed to glue a 4 x 12 inch black strip of construction paper along the bottom of the white paper.  We discussed how we were creating a portrait and portraits are usually taken from the chest up.  Students quickly realized that the black strip was Frankenstein's shirt. 

A green square ( 2 x 4 inches) was then glued to the center of the black strip.  Students then picked out two different shade of green construction paper (7.5 x 10 inches).  A demonstration was given on how to draw a line one of the green pieces to create a nose.  Students cut on the line and glued that onto the 2nd shade of green construction paper.

Ears were then cut out and glued on.  We reminded ourselves of the characteristics of Picasso's cubist portraits and students were reminded that it was acceptable to have the ears different shapes, colors and glued in different positions.

Day 2:
During this class period we reviewed the things we learned about Pablo Picasso, cubism and abstract art.  Students were shown how to create the hair out of black construction paper (2 x 7.5 inches), the mouth and eyes and teeth.  Additional details (stitches, bolts, pupils, etc.) were added with a black sharpie marker.
Student adding additional details.

Student Examples:


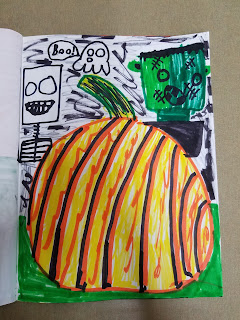
Those incredible SkEtChbOOk Drawings!

Just had to share these two first grade sketchbook drawings that caught my eye.  Great use of space, fantastic coloring and so creative! My art teacher heart is so happy!!!


Thursday, September 28, 2017

Eric Carle's Grouchy Ladybugs

Kindergarten
3 class periods

Eric Carle's Grouchy Ladybug, Kindergarten Art Lesson

I haven't done this project in a few years.  It may be due to the time it takes to cut and prep the paper for this project or it may be due to the mess created from painting with kindergarten students.  One thing is for sure though, these grumpy bugs sure are cute, and once again, I discovered it definitely is worth the mess and paper prepping.

The colors we painted for this project are red, red-orange, black, blue-black, green, yellow-green, light blue or light purple.  You can click my link from the first time I did this lesson to get further details about the artist and the steps.  The Grouchy Ladybug

To make it a bit easier for those of you who are new to the teaching world and would like to know a few more steps, I listed below the paper sizes I used for this lesson:

8 x 8 inch white tagboard (background)
3 x 8 inch green paper (grass)
6 x 6 inch red paper (ladybug's body)
2 x 8 inch black paper (spots)
3 x 3 inch black paper (head and legs)
3 x 3 inch light purple paper (eyes and antennas)


Happy Ladybug Making!

Examples from this school year: