Fifth Grade Art Lesson
3 Class Periods
(45 minutes each)
About the Artist:
Paul Cezanne was born in France on January 19th, 1839. Cezanne's artwork is best known for its strong designs, color and interesting compositions. The artist passed away at the age of 67 in France after becoming ill from getting caught in a storm while painting outside. The year was 1906. Cezanne often says this about his work and painting in general, "We must not paint what we think we see, but what we see."
I share the following video clips with my students to help provide additional information about the artist.
Still Life With Apples and Peaches
Day 1:
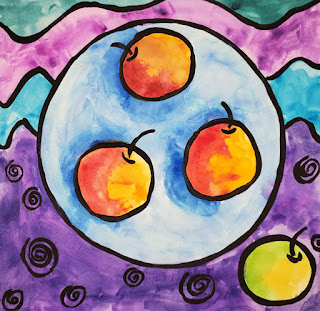
After learning about the artist, students are given a 12 x 12 piece of paper. We begin by setting up the composition. For the plate, you could have students free hand a large circle or you could have them trace a paper plate or ice cream lid to get a large enough circle.
Next, students are shown how to draw apples on the plate (I recommend 3 or 4 apples) and encourage them to draw an additional apple off the plate. We use the size of our fist as our reference to the size of the circles we would like to draw.
The background is divided in half and two different patterns are placed in the background. We discuss how Cezanne often uses cloth in his still life paintings. The two different patterns represent two different types of cloth.
If there is still time remaining, I begin to discuss with the students how to paint the apples. To create red apples, I have students paint their circle shapes orange first with watercolor paint. Then on one edge of the circle they go over the orange with red paint. The two colors will blend together and the orange color that remains will look like a highlight. To paint green apples, paint the circle shapes yellow first. Then on one edge of the circle go over the yellow with green paint. Again, the colors will blend and the remaining yellow will look like a highlight on the apple.
Day 2:
During the second class period, I demonstrate to students how to paint the plate. I show students how to create an opaque color from the watercolor paint. Using blue paint, we paint a very opaque line that follows half of the curve of each apple. Next, using only water on our brush, we smear this opaque blue line to paint the rest of the plate. I remind students not to smear the dark line completely away, for we want this to look like a shadow beneath each apple.
For the rest of the class, students are allowed to paint the background any colors they wish.
Day 3:
On the last day of this lesson, students use liquid black tempera to outline a bold black line over the objects and details in their composition.
Student Examples:


