This is our very last art prompt for the school year. What a crazy school year it has been! I am keeping my fingers crossed that when we start our next school year we will have a situation that seems a bit more familiar to all of us. I sure do miss seeing all of you every day. I miss your smiles, your stories and your hugs. Keep drawing, painting and creating this summer. It is good for your brain and good for your soul. If you want to do any of these prompts over again, do a Google search for Crazy Busy Art Room on blogspot. You will find the prompts under the label Art Prompts. I hope you all have a wonderful summer!
Supplies Needed: paper, pencil, eraser, black sharpie marker, crayons, watercolor paints, and a brush
I have posted photos of each step, but please read through the directions for additions instruction or creative choices.
Step 1: Draw an oval near the top left of your paper.
Step 2: Draw a backwards "S" starting at the bottom of the oval.
Step 3: Double the line.
Step 4: Take the bottom line of the "S" and curve it to create a happy face.
Step 5: Double the line.
Step 6: Take one of the lines on the body and curve it back to make a backwards letter "C".
Step 7: Double the line. Have the end come to a point to make the tail.
Step 8: Erase the lines where the tail overlaps the body.
Step 9: Erase the line that connects the head to the body.
Step 10: Add eyes and nostrils.
Step 11: Outline with a black sharpie marker.
Step 12: Add a small arc to each eye. Do not fill it in with the black marker.
Step 13: Using crayons, create a pattern on the snake's body. Press hard with the crayons.
Step 14: Add a red tongue and color the small arc part of the eye white.
Step 15: Paint the snake any colors you wish.
Step 16: Paint the background black.
Labels
- Art Prompts
- Kindergarten Art
- First Grade Art
- Third Grade Art
- Fifth Grade Art
- Fourth Grade Art
- Second Grade Art
- Running Adventures
- Sixth Grade Art
- Art Journal Ideas & Drawings
- Classroom Tips
- Youth Art Month
- Art Club
- Famous Artists of the Month
- Art Mini Lessons
- Adaptive Art
- Classroom Community Building
Friday, May 22, 2020
Thursday, May 21, 2020
Crazy Busy Art Room Art Prompt 45
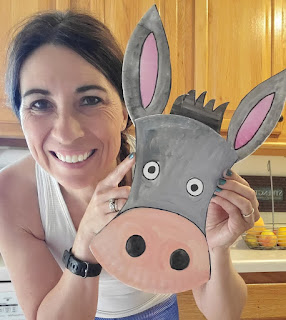
We are down to just 2 art prompts left. Today we have a special request on how to make a donkey.
Supplies Needed: a paper plate (if you don't have a paper plate, cut a circle out of paper the size of a plate), pencil, sharpie marker, black construction paper 4 x 4 inches or a black painted piece of paper, scissors, and a glue stick.
I have posted photographs of each step, but please read through the directions for additional instruction.
Step 1: Draw a half circle on the bottom of a paper plate.
Step 2: Draw a curved line that starts at the half circle and ends near the top of the plate.
Step 3: Repeat this step on the other side of the plate.
Step 4: Draw an oval on each side of the plate. Point the ends on each oval.
Step 5: Draw 2 circles inside the half circle. This will be the donkey's nostrils.
Step 6: Draw 2 eyes.
Step 7: Outline your pencil lines with sharpie marker.
Step 8: Paint the face of the donkey. Use any color you wish. Brown, gray, blue. I mixed white and black together to make gray.
Step 9: Paint the ears the same color.
Step 10: Paint pink inside the ears.
Step 11: Paint the nose of the donkey. I mixed white and orange together to create a peach color.
Step 12: Paint the nostrils black.
Step 13: Get out a piece of black construction paper that is 4 x 4 inches in size. If you do not have a black construction paper you can paint a piece of paper black.
Step 14: Re-outline with sharpie if you need to on areas that you may not be able to see any more.
Step 15: Cut off the ears.
Step 16: Glue ears on top of the head.
Step 17: Draw a zig-zag line on the black paper to create the mane for the donkey.
Step 18: Cut out the mane.
Step 19: Glue the mane on top of the head.
Wednesday, May 20, 2020
Crazy Busy Art Room Art Prompt 44
I thought it would nice to do our art prompt outside today using sidewalk chalk. It is suppose to be gorgeous outside.
Now don't worry. If you don't have sidewalk chalk or a place to draw outside, you can still do this prompt using paper, pencil and markers. I actually recommend drawing the steps out on a piece of paper first (just draw, no coloring-unless you want to) so you don't have to carry your computer outside.
Supplies Needed: sidewalk chalk and a surface to draw on outside
Step 1: Draw 2 circles for eyes. Draw them side by side. I used white chalk for this, but use whatever color you like.
Step 2: Color the circles in.
Step 3: Draw a smaller circle inside the first circle. Color the circles in. This will be the pupil inside the eyes.
Step 4: Outline around the large circles. Make sure the large circles end up touching.
Step 5: Add 2 antennas on top of the eyes.
Step 6: Draw a half circle that starts and ends at each eye. This will be your butterfly's head.
Step 7: Color in the half circle.
Step 8: Add a smile.
Step 9: Add a long "U" shape to the head to create the body.
Step 10: Divide up the body into four space by drawing 3 lines.
Step 11: Color in each space with colors of your choice.
Step 12: Add 2 teardrop shapes to create the top wings. Start where the head and body connect.
Step 13: Add 2 teardrop shapes on each side of the body to create the bottom wings.
Step 14: Add smaller teardrop shapes inside each wing.
Step 15: Color the wings with any colors you wish.
Subscribe to:
Posts (Atom)


