Wednesday, March 24, 2021

Red, White and Blue Skull Inspired by Georgia O'Keeffe

 Fourth Grade

2 Class Periods

50 minutes per class

Red, White and Blue Skull Inspired by Georgia O'Keeffe, Fourth Grade Art Lesson

About the Artist:

Georgia O'Keeffe was born in Sun Prairie, Wisconsin on November 15, 1887. At the age of 12, she knew she wanted to be an artist.  This was a huge dream to have at this time, since most artist were men.  Georgia enjoys painting abstract works of art that are inspired by the time she spent in New York and in New Mexico.   Landscapes, flowers and skulls are the main subject matter she enjoys to paint.  The artist past away on March 6, 1986. She was 98 years old. For this lesson we used Georgia's masterpiece Red, White and Blue for inspiration.

Red, White and Blue by artist Georgia O'Keeffe.

Georgia O'Keeffe.

Day 1:
On the first day of this lesson, students learn about artist Georgia O'Keeffe.  I provide students with a brief biography and then share this very informative YouTube clip about the artist.  Georgia O'Keeffe: A Brief History

After viewing the video, we examine and discuss the Red, White and Blue painting by artist Georgia O'Keeffe.  We then get to work recreating the background of the masterpiece using red, blue and black liquid tempera paint.  Students are given instruction on how to paint the colors on a 12 x 18 inch piece of paper.

Pieces are set on the drying rack to dry.  Remember to have students write their name on their paper before they start to paint!

Day 2:

We begin day two with a video clip featuring the artist being interviewed about her obsession with bones and what they mean to her.  O'Keeffe Interview: Using Bones in Her Artwork.

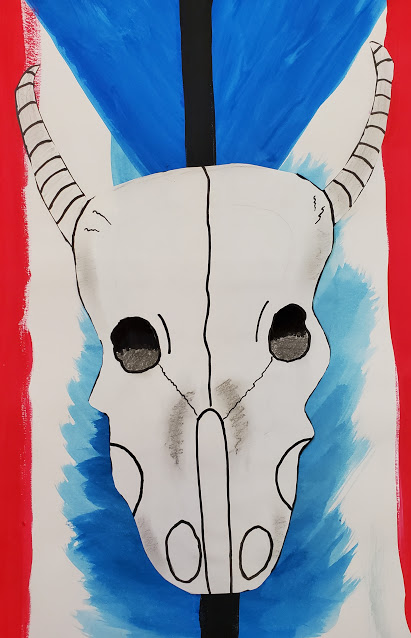
After the video, students are given another 12 x 18 inch piece of white drawing paper.  Through follow along instruction they are shown how to draw a skull on their paper and are given tips on how to shade the skull.  Once the drawings are complete, they are cut out and glued to the background painted in the previous class.

Students were quite successful with this project.   They enjoyed learning about an artist that grew up in a state in which they lived and were fascinated with the subject matter of bones.  I am very fortunate to be married to a hunter, so I was able to bring in several deer skulls for the students to look at for inspiration for this project.

Student Examples:


Tuesday, March 2, 2021

Clay Cat

 Kindergarten

2 Class Periods 

50 minutes per class

Clay Cat, Kindergarten Art Lesson

Day 1:
For a number of years I have been doing the clay owl lesson with my kindergarten students.  I love this lesson, but am at the same time getting a bit tired of it.  One day during one of my many searches for lesson ideas, I stumbled across a very cute cat drawing and wondered to myself if it would be possible to turn that drawing into a clay sculpture.  

I was so nervous testing this idea out with my first group of kindergarten students.  By the end of class, my heart was soaring.  These projects turned out adorable and the students were more than capable of following directions.  BIG WIN for this HAPPY ART TEACHER!

1. Start with a clay ball slightly smaller than your fist.

2. Next, have students flatten the clay so it is "pancake thick."  I have them just squish the clay with the palm of their hand.

3. Have students roll the bottom part of the slab.  This will be the tail for the cat.


4. Pinch the top of the clay to create two bumps.  One part will be the head, the second bump will be the body

5. On the bump that you consider to be the head, pinch out two ears.

6. Using a stick or a needle took, incise the line where the tail and the body meet.

7. Draw a line to show the back leg of the cat.


8. Draw a line to show where the head and the body connect.

9. Take your thumb and smoosh a spot in the front of the tail.

10. Add lines to create the front paw.

11. Draw a face for your cat.  I have students use an old marker cap to create the eyes.


12. Once, cats are complete, I have students stand the cat upright and bend the body to give it a slight curve.  The cat should be able to stand all by itself.  Have students write their name on the back.  Allow several days to air dry before placing in kiln.


Day 2:
Students are very excited to get their cat sculptures back by the time they come to art class.  After giving a basic description of the firing process, I remind students how fragile their pieces are right now.

Using tempera cakes, I demonstrate to students how to paint their cats.  As a finishing step, we use liquid black and white tempera paint to go over the eyes and incised lines.

After the sculptures dry, I spray them with an acrylic sealer to keep the paint from rubbing off and give the pieces a nice gloss shine.

Student Examples: