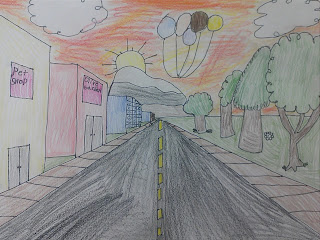
4 Class Periods
 |
| 1-Point Perspective Drawing, Third Grade Art Lesson |
"There are three aspects to perspective. The first has to do with how the size of objects seems to diminish according to distance: the second, the manner in which colors change the farther away they are from the eye; the third defines how objects ought to be finished less carefully the farther away they are."
-Leonardo da Vinci
Day 1:
- As a class we discussed the idea of perspective. We discussed bird's eye view, worm's eye view and the perspective of person looking straight on at an object.
- Students learned that drawing objects in the correct perspective would enable them to create drawings that appeared more realistic. Their drawings could become more 3-D with this skill.
- We discussed that there are many different types of perspective drawings (1-point, 2-point and 3-point). Students were informed that they would be using 1-point perspective.
2. Where the "X" intersected students placed a small dot. This is known as the vanishing point. Students learned very quickly the importance of this small dot in their composition.
3. A road was created first, then the sidewalks. Students were shown how to use their ruler correctly to create a straight line. Horizontal lines were created on the sidewalk.
4. Students were shown how to draw trees on one side of their composition. We discussed how the largest trees needed to be in the foreground. As they drew more trees along the sidewalk, the trees needed to get smaller and disappear by the vanishing point.
5. Students used the vanishing point to create a horizon line behind the trees showing where the sky and ground met.
Day 2:
1. Students were shown how to draw buildings within the composition. Vertical and horizontal lines were discussed. Students were shown how use the vanishing point on certain sides of the buildings to create doors, windows and signs in the correct perspective.
2. Using the rest of class time, students continued to add details to the drawing.
3. A black sharpie marker was used to outline the entire composition.
Day 3 and 4:
1. Details were continued.
2. Projects were colored with colored pencils.
Examples of Student Work:


No comments:
Post a Comment