Monday, April 13, 2020

Crazy Busy Art Room Art Prompt 17

Brrr! What month is it again? YIKES! This weather sure has had some ups and downs lately. Make sure on those nice days you take advantage of being outside. It will help boost your mood if you are beginning to feel a bit down.
Hopefully, some of these drawing activities also help boost your mood a bit, too. I know I always feel a bit better when I get the chance to create something with my hands.
Today we will be making a shark drawing. We will also be looking at the technique of showing VALUE. This is where you can see the range of color go from light to dark. This concept should be familiar to my third grade and older students. For my younger students I think you still be able to manage this lesson with the instructions given.

Supplies Needed: Paper, Pencil, Eraser, Crayons, Black Marker
Photos are attached to aid in the steps, but please read all the directions for further instruction or creativity options.
Step 1: Fold a piece of paper in half lengthwise.

Step 2: Make a small arc near the middle of your paper. This will be the tip of the shark's snout.

Step 3: Extend the ends of the arc to the bottom corners of your paper.

Step 4: Add 2 dots for nostrils near the top of the snout and 2 eyes. One on each side of the shark's head.

Step 5: Draw an arc to make a sad face. Make it nice and big. This will be your shark's mouth.

Step 6: Make a smaller arc underneath the arc you just drew. Have it start on the ends of that arc, so they connect. Now your shark's mouth will look like it is open.

Step 7: Add triangle shapes to create teeth. How many sharp teeth will your shark have?

Step 8: Near the top of your paper add a line that looks like a wave. This will be your HORIZON LINE. Remember a horizon line shows the viewer where the sky and land meet or in this case, where the water and sky meet.
Feel free to add any additional details that you wish to the water. Fish swimming, a boat, people swimming, a scuba diver, a pirate ship. It is completely up to you!

Step 9: Using a black marker, color in the eyes and inside of the mouth. If you want to outline the rest of your drawing you may.

Step 10: Using a gray crayon, color the right side of the shark. Press hard with the crayon.

Step 11: Continue using the gray crayon. Now color the middle of the shark's body. Use MEDIUM pressure. We do not want this area has dark as the right side of the shark.

Step 12: On the left side of the shark's body, color very lightly with the gray crayon. When you are done coloring you should notice the transition of the color gray go from LIGHT to DARK. We call this VALUE.

Step 13: Color the rest of your picture using colors of your choice.


Do your best to have a warm, cozy Monday.
Love,
Mrs. Cornell

Wednesday, April 8, 2020

Crazy Busy Art Room Art Prompt 16

Good morning friends! Today we are going to be making a chameleon. I only drew one on my paper, but you could draw a whole jungle full of them if you like.

Remember this is the last prompt for this week. After or mini Easter break, we will pick back up on Monday at 10am.
I have attached photos with brief instructions. I encourage you to read through all the directions listed below for any further instruction on steps or creativity options.
Supplies Needed: paper, pencil, eraser, medium of your choice (markers, colored pencils, paints, crayons)
Step 1: Draw an "L" in the center of your paper with a pencil.

Step 2: Connect the ends of the "L" with a curved line.

Step 3: Draw a curved line to create the body. This should start at the back of the chameleon's head.

Step 4: Draw a horizontal line to create the belly. Add 2 small ovals to make the front and back legs.

Step 5: Add a swirl line to create the tail.

Step 6: Double the swirl line to make it thicker.

Step 7: Add an eye and a tongue.

Step 8: Add 2 horizontal lines under the chameleon to create a tree branch for him to rest on.

Step 9: Add leaves to your branches.

Step 10: Add a pattern of your choice to your chameleon's body. A pattern is a design that repeats. What pattern will you come up with? Will it be flowers? Will you use zig-zag lines? Hearts? Rainbows? I can't wait to see what you come up with.

Step 11: Color your picture using the medium of your choice. I used markers and a bit of colored pencil for mine. What will you use?

I know Easter will be a bit different this year for many of you. In my household there will be fewer people for starters. We will still have our traditional egg decorating contest, but this year it will have to be done virtually versus in person. Hang in there everyone.
Hugs to you all.
Love,
Mrs. Cornell

Tuesday, April 7, 2020

Crazy Busy Art Room Art Prompt 15

We have a bit of rain this morning, so I found it fitting to make a rainy day picture. I think the forecast for this afternoon is to be nice and sunny, hopefully after you are done creating you can get outside for a bit and enjoy stomping through some puddles. 
I have posted the photos below to help you, but please make sure to read through the directions for extra details or creative choice options.
Supplies Needed: paper, pencil, eraser, crayons, watercolor paints, and a brush.
Step 1: Draw an arc near the top your paper. Notice how this arc stretches acoss from one edge of your paper to the other. This will be the top of the umbrella.
Step 2: Draw a scallop line to connect the arc. This will be the bottom of the umbrella.
Step 3: Draw 2 lines starting at the bottom of the umbrella. These lines should have a bit of slant as you near the bottom of your paper. Connect the lines with a horizontal line. This will be the raincoat for your person.
Step 4: Add 2 legs coming form the bottom of the raincoat.
Step 5: Draw shoes or boots attached to the legs.
Step 6: Draw a curved line inside the raincoat to make the arm for your person.
Step 7: Add a mitten and an umbrella handle.
Step 8: Add buttons and a pocket to the raincoat. Using curved lines divide the space within the umbrella.
Step 9: Using a white crayon create rings that go around the boots. See finished example for help. Press hard with the crayon. We are trying to create a resist.
Step 10: Using a white crayon add dashed lines to create raindrops. See finished example for help. Once again make sure you pressing hard. How many raindrops will you have in your picture? Just a few as if it is just starting to sprinkle or lots of raindrops to make a downpour.
Step 11: Using crayons, add a rainbow to your background if you wish. Do you know the order of the colors of the rainbow? Red, Orange, Yellow, Green, Blue and Violet.
Step 12: Using blue, violet and black watercolors, paint the background. I like to mix blue, violet and black in my sky to make it look dark and stormy. I kept the puddles near the bottom of my paper just blue.
Step 13: Continue painting the rest of your picture using colors of your choice.
Step 14: Once dry, outline with a black marker to pop out lines that are hard to see. If you don't have black marker a black crayon could work, too.
Step 15: Add designs or patterns to your umbrella if you so wish.

Good luck finding those rainbows this afternoon.


Monday, April 6, 2020

Crazy Busy Art Room Art Prompt 14

Good morning everyone! Today we are going to be using a our creativity to create architecture using shapes cut from newspaper. Architecture is a general term to describe a building. What type of building will you make today? In my example I made a castle, but you can make a house, a restaurant, a school or even a whole city or neighborhood! I can't wait to see what you come up with!


I have posted some photos below with general guidelines to complete this project. Please read the directions listed below for more detailed instructions.
Supplies Needed: newspaper, a piece of paper, scissors, glue, black marker
Step 1: I like to take a few minutes to think about what I want to create before I start cutting out shapes. This way I can think about some of the shapes I may need to create my idea. Once you have your idea, start cutting out different shapes from the newspaper. Squares, rectangles, triangles, circles, etc. Make a range of different sizes so you have a few to pick from once you start creating.
Step 2: On a plain piece of paper, lay out the pieces you cut out of the newspaper. Play around with the layout of these shapes until you figure out how to create what you want. Did more shapes or a different size? Feel free to cut out more shapes from the newspaper or cut down some of the shapes you already have. BE CREATIVE! This lesson is all about what can you come up with.
Step 3: Once you have decided on the layout you like best, glue your shapes in place.
Step 4: Use a black marker to add additional details to make your creation complete. Are there windows? Doors? Signs on your building? What does the area look like around your building or buildings? These details are key! I can't wait to see all of the cool things you come up with today.

Have a fantastic Monday! I hope you are all hanging in there.
Big hugs,
Mrs. Cornell


Friday, April 3, 2020

Crazy Busy Art Room Art Prompt 13

Happy Friday Comet Artists! You probably have heard of repetition and rhythm in music, but did you know art can also have repetition and rhythm as well? We are going to be making some penguins today that will show repetition and rhythm in a work of art.


Supplies Needed: paper, pencil, eraser, medium of your choice (markers, crayons or paint)
I have posted photographs of the steps, but please read through the directions for any additional instructions or creative options.
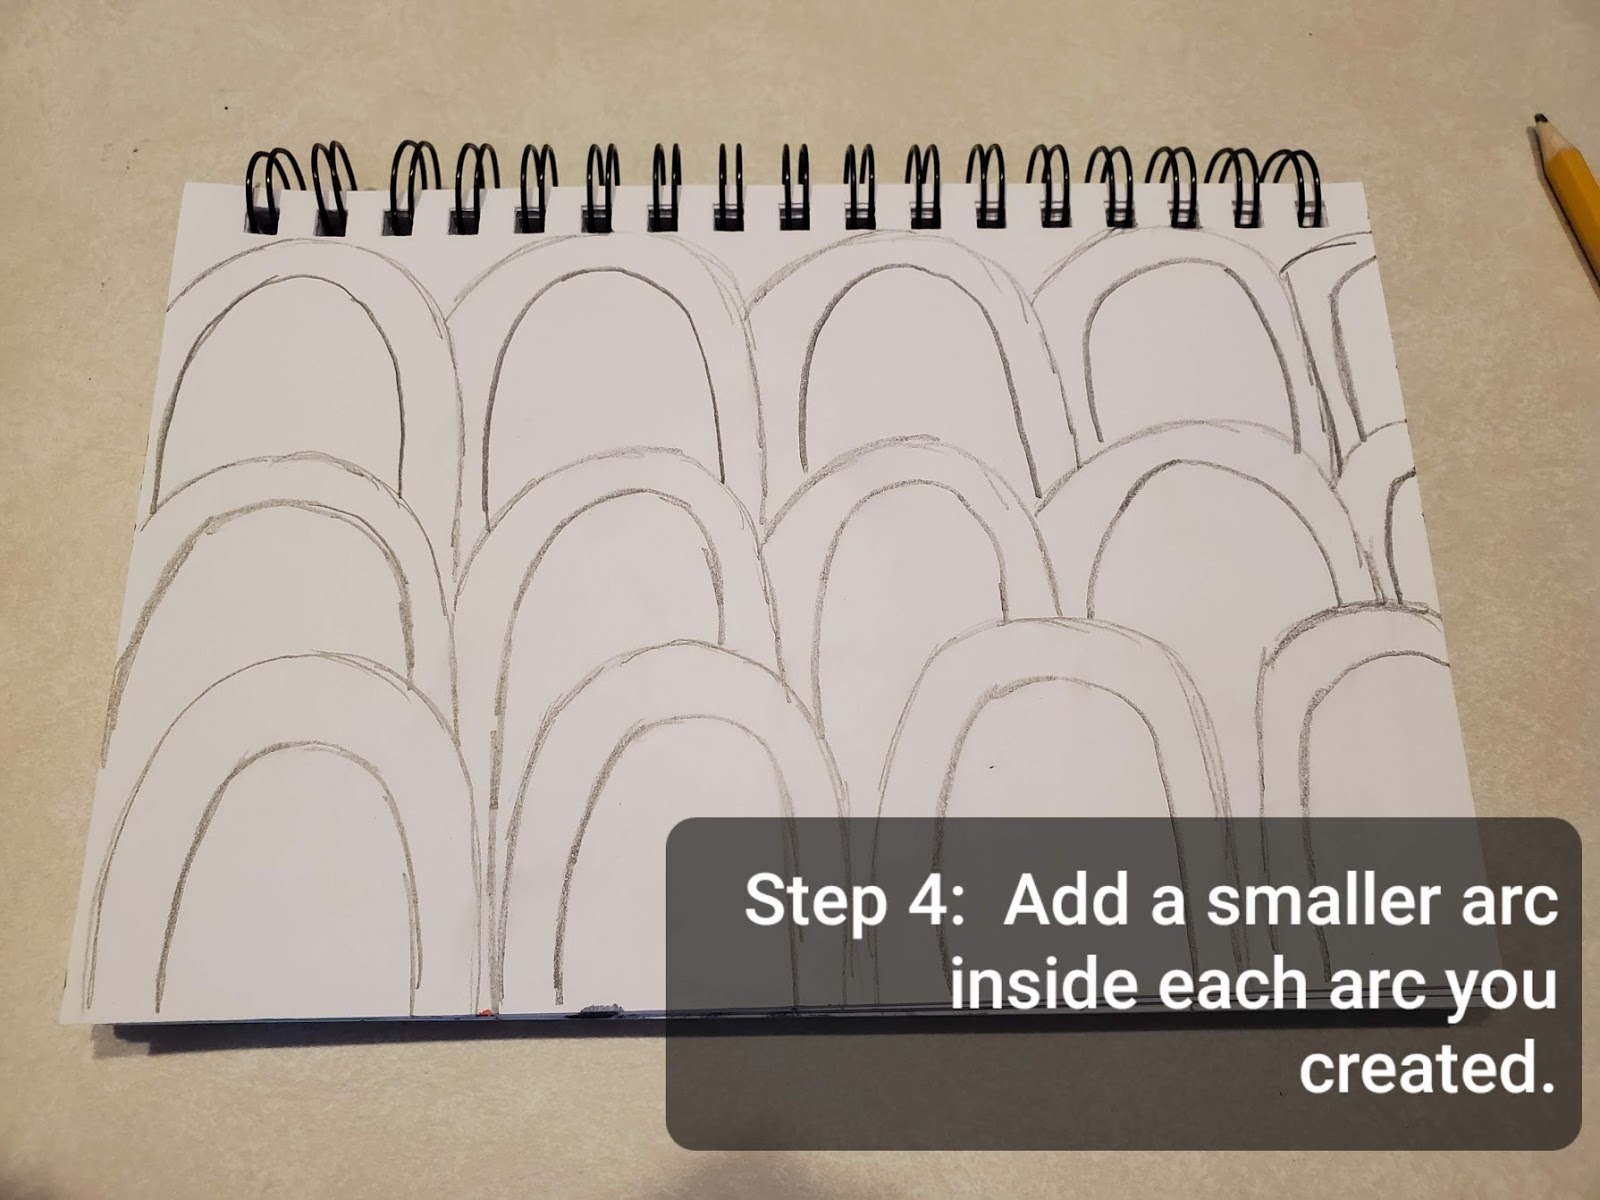
Step 1: For this lesson, I have turned my paper so it is horizontal. You may keep your paper vertical if you choose, but keep in mind you will create more rows of penguins this way. Along the bottom of your paper create an arc that starts at the corner of your paper. Repeat the shape along the entire bottom of the paper. It is ok if an arc has to go off the paper. Roughly you should be able to fit your fist inside each arc. If you create the arc smaller, you will just have more penguins.
Step 2: Repeat the process creating a second row behind the first.
Step 3: Add another row. Keep adding rows until you reach the top of your paper.
Step 4: Now add a smaller arc inside each arc you just created. This will become the penguin's face.
Step 5: Add a triangle for a beak and 2 dots for eyes in each smaller arc.
Step 6: Paint or color the beaks.
Step 7: Paint or color the larger arc black.
Step 8: Add small pink dots to each penguin's cheek. This step is optional, but I like the look of the penguin's blushing a little bit.
I just want to thank all of you who participate in my art prompts. It makes my whole day when I see a picture of you holding up your artwork in the comments below.
Keep sharing and telling others about this art opportunity. It is my goal to reach out to as many families as I possibly can. If you know of a family or friend who may not have access to wifi, please let them know they can pick up a hard copy of the directions to these lessons at the Elementary or Middle School office. They just need to call ahead to arrange for pick up.
Have a great Friday! Looking forward to seeing those penguins!