Well, we are finally here. Our last week of art prompts. We are zooming into the week with a request from Landon. It's a bird! It's a plane! It's Superman!
Supplies Needed: paper, pencil, eraser, medium of your choice (markers, crayons, colored pencils, etc.)
I have posted photos of each step, but I encourage you to read through the directions for additional instructions or creative choices.
Step 1: Draw a rectangle in the center of your paper. Notice it is at an angle. Round the edges. This will be the head for our hero.
Step 2: Give your superhero some ears.
Step 3: Add hair to your superhero's head.
Step 4: Add details to create the face. Eyes, nose, mouth, eyebrows.
Step 5: Add two curved lines starting at the bottom of the head.
Step 6: Connect the lines with a wavy line. This will be your hero's cape.
Step 7: Add lines inside the cape to make it look like fabric.
Step 8: Add a curved line on each side of the cape for your hero's shoulders. Start about the same height as the ears.
Step 9: Add another curved linen each side to make the bicep.
Step 10: Attach a rectangle shape to the end of each curved line. Round the edges.
Step 11: Add lines inside to create fingers.
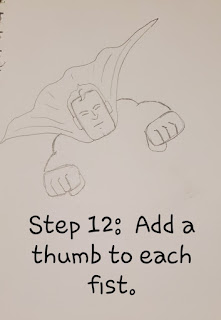
Step 12: Add a thumb to each fist.
Step 13: Add details to the thumbs. Give the top of the fists bumps to make knuckles.
Step 14: Connect the fists with 2 curved lines to make the chest.
Step 15: Add 2 lines coming up in a diagonal. This will start the logo on our hero's costume.
Step 16: Attach the diagonal lines with a slight curved line.
Step 17: Add details inside the logo to help give the illusion of the top of the letter "S."
Step 18: Add curved lines to the inside of each arm to finish creating the muscles.
Step 19: Add lines coming from the head to create the neck on our superhero.
Step 20: Now draw the edges of the cape so they touch the bottom of the neck. You will have to erase your previous cape starting lines.
Step 21: Add rectangles of different widths and lengths to form a city below our superhero.
Step 22: Give each building some windows.
Step 23: Add a horizon line behind the buildings.
Step 24: Add smaller rectangles on the horizon line.
Step 25: Shade the smaller rectangles and the ground with your pencil.
Step 26: Add clouds to your sky.
Step 27: Color with medium of your choice.


No comments:
Post a Comment